June 29, 2013

Don't Know What to Do with Fresh Sage? Try Savory Feta and Sage Muffins

Click for recipe for Feta Sage Muffins
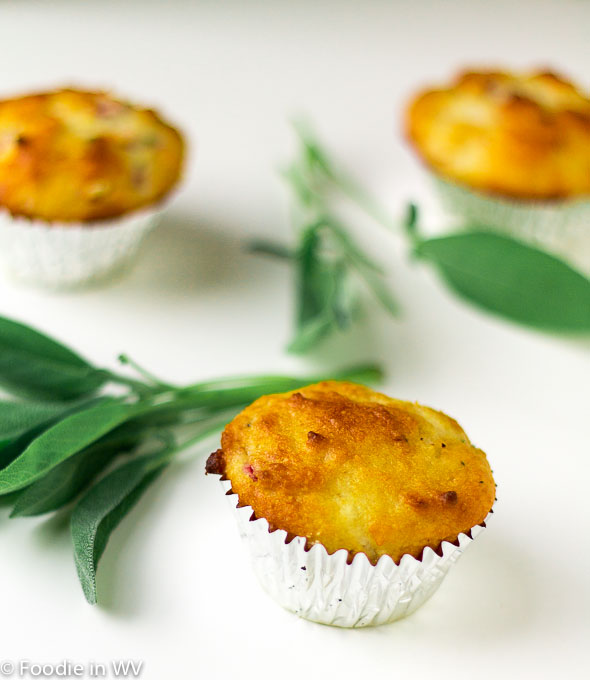
Gluten Free Feta Sage Muffins


I have started to hate eating at restaurants. When I was younger I ate at restaurants, once or twice a week. Now I eat out maybe once a month. A large part of it has to do with my expectations on food. In my 20's I was happy with any food that I didn't have to cook myself. Now that I am in my mid-thirties my expectations are much higher. If I am going to spend 10 dollars on a burger, it better surpass any burger I can make at home. There lies the problem. It rarely is as good as I can make at home. Now my expectations might be higher than most people. I cook daily and can adequately cook most recipes and dishes. There are also some things that I like more at restaurants that cooked at home, french fries is the best example. They always taste better at my favorite fast food restaurant. Baked goods can be split down the middle, there are some baked goods that taste perfect at a bakery such as donuts, but for the most part I prefer to make them at home. Muffins are an example of a baked good that I think tastes better homemade. Last week I tried a new recipe for Feta Sage Muffins.

This recipe has 13 ingredients. It takes 30 minutes of total time, 10 minutes of which is active and makes 12 muffins. I made a significant amount of changes to the original recipe. First since I eat gluten free I substituted gluten free all-purpose flour for the whole wheat pastry flour. Since I cook gluten free there needs to be eggs or something equivalent to rise the muffins or they will end up very flat. Therefore I added one large egg to the recipe. Finally, I was out of muffin liners so I used ramekins instead. I ended up with a total of 7 ramekins.

I served these muffins as a side to a bean recipe. They were perfect and created a nice savory side dish. The combination of the feta and sage was perfect. These would make a nice compliment to a pork or chicken recipe or a bean soup. Converting the recipe to being gluten free worked perfectly and serving them in ramekins made them the perfect size to serve as mini breads to go with the beans.

For the recipe go to Feta and Sage Muffins.

June 27, 2013

Bake Fresh From the Garden: Strawberry Sage Muffins

Click for Recipe for Gluten Free Strawberry Sage Muffins
Gluten Free Strawberry Sage Muffins


With my oldest home for the summer I have been baking and cooking up a storm. They are able to eat more food than I would think possible for two little children. They are always able to surprise me, especially when it comes to food. As I have posted before I have a new herb garden after my last one left my porch (with help). I try to use everything that I grow in my garden, with little waste. The herb garden that my mother in law purchased at the farmer's market had approximately 15 different types of herbs making for a lot of new recipes. In particular I had 4 large sage plants which I searched for new recipes to try. My two boys love berries in baked goods, so I searched for recipes that combined berries and fresh herbs. I decided on a new recipe for Strawberry-Sage Muffins.

This recipe has 9 ingredients. It takes 40 minutes of total time, 10 minutes of which is active and makes 18 servings. I did make a number of changes to the original recipe. First since I eat gluten free I used a combination of brown rice flour and gluten free all purpose flour as a substitute for the all purpose flour. I love sage, so I used 8 large sage leaves in total. One thing that I did slightly differently than the original recipe is that I tossed my strawberries with the sugar and let it sit for 5 minutes before adding it to the batter. This helped to sweeten the berries and made for a nice flavor in the finished muffins. Gluten free baked goods tend to take a little more batter so I ended up with a total of 14 muffins. I always fill my gluten free muffins to the top of the muffin liners since they don't rise as much as regular muffins.

The strawberries in these muffins had a nice sweet taste which worked perfectly with the mild taste of the sage. The sage works as a nice compliment to the berries without being overpowering. My boys actually thought that these were strawberry muffins and had no idea that they contained herbs from my garden. These muffins were a great way to use fresh sage.

For the recipe go to Strawberry Sage Muffins. 

June 26, 2013

Looking for a Great Homemade Gift Idea? Try Blackberry Sage Vinegar

Click for Recipe for Blackberry Sage Vinegar
Blackberry Sage Vinegar


I grew up in a family that made everything from scratch. My mom was the oldest of 12 kids and my grandfather, great grandfather and aunt were all artists. I thought it was perfectly normal to make candles and soap by hand and when we celebrated the holidays at my aunt and uncles we made pottery and all sat around watching the raku firing. I think my love of making as many foods from scratch comes from this upbringing. We grew up with very little money, but I never really knew. I knew that my mother was a beautiful seamstress and for one of my birthday parties we went to the beach and made sand candles. My friends talked about the candles that they made for years to come. The idea of not spending money on things that you can make or re-purpose is something that I have passed on to my kids. My kids can't wait until their tomatoes are ready to eat and helped me to plant all my flower and vegetable posts. As many of you know I grow my own herbs. My new herb garden is doing great, so much so that I was swimming in sage last week. I decided the best thing to do with the abundance was to make Blackberry Sage Vinegar.

This recipe has three ingredients. It takes 2-3 days total (including time for the berries to soak into the vinegar) and makes one quart sized jar. I followed the recipe almost exactly as written. I did make two jars so I used a total of 14 sage leaves and two containers of blackberries. I filled the blackberries full in the canning jars since I wanted lots of flavor. Make sure to sterilize your jars before making the vinegar. Vinegar shouldn't grow bacteria, but I try to be as safe as a I can with any food prep. I let my jars boil for ten minutes to ensure that they were fully sterilized. After the vinegar was complete I made a funnel out of parchment paper and poured the strained vinegar into a cleaned and sterilized wine bottle.

I love how pretty this vinegar looks in the bottle once completed. Making homemade flavored vinegar is a great way to use garden herbs and makes a beautiful gift as well. I also made a batch of tarragon vinegar that I will post about later this week. Herbs can be used in a variety of ways and this recipe is a great one!

For the recipe go to Blackberry Sage Vinegar.

June 25, 2013

Don't Run to the Store: Make Great Homemade White Bread at Home


Click for Recipe for Homemade White Bread
Homemade White Bread


We eat a lot of carbs in our house. Even though I follow a gluten free diet my family loves baked goods. I normally modify recipes to be gluten free so that I can eat them, but I also occasionally make regular foods that the rest of my family can enjoy. One of the major things that just doesn't taste the same gluten free is bread. Gluten free bread just doesn't have the same texture or taste, trust me I have tried just about every recipe I have been able to find. However, regular homemade bread is delicious and my family loves it. Since I canned homemade jam last night I knew when I woke up this morning that my two boys would demand homemade bread. There is something about homemade jam that just screams for a great slice of bread. Today I tried a new recipe for White Bread from allrecipes.com.

This recipe has 6 ingredients. It takes 3 hours of total time, 20 minutes of which is active and makes 36 servings. I only made a few minor changes to the original recipe. First I decreased the total amount of servings to 12 or one loaf. The recipe doesn't specify how long it takes to allow the bread to rise, but in my kitchen each rise takes approximately an hour. If you have never shaped bread the easiest way to do so is to make the dough into a rectangle, fold it into thirds like you would a letter and pinch the seam and sides closed.

My two boys devoured almost this whole loaf within a couple of hours. I liked that it was easy to slice and I had no problems with the bread overbrowning since the amount of sugar wasn't too high. The loaf came out looking nice and the dough was easy to work with, which is nice since some recipes are harder to work with than others. Overall, this is a nice basic bread recipe that would work well for people that have no bread making experience.

For the recipe go to White Bread.

June 24, 2013

Craving Cookies and Ran Out of Eggs? Try Eggless Oatmeal Raisin Cookies

Click for Recipe for Eggless Oatmeal Raisin Cookies
Gluten Free Eggless Oatmeal Raisin Cookies


I canned a batch of cherry jam this evening. There is something about making homemade jam that always puts me in a great mood. It is comforting and reminds me of my childhood. One of the main reasons I love to cook and bake is that it makes me feel connected to my mother. Even though she has been gone for over 7 years, I am instantly reminded of her when I am in the kitchen. She loved cooking and was one of the best cooks that I have known. Never needing to measure, she made delicious meals and was always happy while doing it. So as I made jam this evening, I thought of her and smiled. She would have loved to be standing next to me, talking up a storm and enjoying every minute of it. One of the first things that my mother taught me to make growing up was cookies. To this day I haven't met very many cookies that I don't like. Last week I tried a new recipe for Eggless Oatmeal Raisin Cookies.

This recipe has 11 ingredients. It takes 46 minutes of total time, 10 minutes of which is active and makes 36 cookies. I did make a few changes to the original recipe. First I used brown rice flour instead of all-purpose. I was out of chocolate chips so I omitted them and increased the amount of raisins. Be sure to watch the cookies in the oven. They will go from under done to done in a short amount of time. Make sure to not move the cookies until they are cool or they will fall apart.

Once these cookies cool they come out slightly crunchy, with a nice taste. My two boys didn't notice that they were missing egg and the butter did a nice job of masking any taste differences. I am always running out of eggs halfway through the week thanks to my kids eating everything in sight and this recipe is a nice way to still be able to bake even if I have no eggs in the fridge. Plus the recipe could be modified to include white chocolate chips, dried cranberries, pecans or the add-in of your choosing.

For the recipe go to Oatmeal Raisin Cookies.

June 23, 2013

Breakfast From Your Herb Garden: Cinnamon Basil and Blackberry Scones

Click for recipe for Cinnamon Basil Blackberry Scones
Gluten Free Cinnamon Basil Blackberry Scones


As many of you have read my herb garden disappeared off my porch last week. At first I was angry and then I called my mother-in-law. She has heard many of my grips over the years and she is always a reassuring presence when I am upset. When my mother passed away 9 days after my oldest was born she quickly stepped in as my support system and has remained there ever since. Immediately after hearing about the theft of my herbs she headed to the Farmer's market. She showed up at my house with a big herb pot overflowing with herbs. Somehow she had gotten the whole pot for 5 dollars. Never underestimate the ability of a West Virginian woman to be able to haggle, it really is an art. She apparently also shared the theft of my herbs to everyone selling plants and came to my house with more than enough plants to start a great new garden plus the pot that was already started. The man that sold the herb garden that was already potted had done a great job starting the pot, but it needed to be cut back, trained and nothing was labeled. So that has been my pet project this week. I have Googled and learned more about uses for herbs than I ever knew before. It turns out that I have over 15 different herbs in the pot, some of which I have never used before. So this week you will be seeing a lot of recipes using fresh herbs. This morning I tried a new recipe for Blackberry Scones with Cinnamon Basil.

This recipe has 12 ingredients. It takes 35 minutes of total time, 10 minutes of which is active. I did make a few changes to the original recipe. The largest change I made was to use gluten free all purpose flour. I did not add the salt since I find with gluten free flour I do not need it. The second biggest change that I made was to greatly reduce the amount of butter. The original recipe uses 1 1/4 cups of butter. While this would be delicious, it would be too much butter for gluten free baking (gluten free recipes tend to need the butter reduced). I also wanted to make it a better breakfast option and reducing the butter to one stick (1/2 cup) allowed for far less total fat content. In addition I used non-fat Greek yogurt. Finally, my dough was a lot stickier than the pictures in the original post. This is normal for gluten free baking, just make sure to roll the blackberries in a small amount of flour before adding them to the batter to keep them from bleeding and turning the dough purple.

My husband loved these. Since I made so many changes they are basically biscuits, not traditional scones. However, even my kids loved the scones and didn't notice that they were eating basil in a breakfast food. I would suggest that using strawberries would be an even better flavor combination. There is something about strawberries and basil that seem to go hand in hand. Overall, this recipe was a great way to use fresh herbs and could be changed to include other types of basil or berries.

For the recipe go to Blackberry Scones with Cinnamon Basil.

June 21, 2013

Need a Chocolate Fix? Try Homemade Cocoa Brownies

Click for Recipe for Gluten Free Cocoa Brownies
Gluten Free Cocoa Brownies


I have never met a piece of dark chocolate that I didn't like. Until tonight. My family and I went to the store and I was happy to find a dark chocolate bar on clearance. It had flax seed in it, which I assumed would be ground up into the bar. Nope. The bar was full of toasted whole flax seed. The combination of bitter dark chocolate and nutty flax seed was not delicious. My oldest took one bit and told me that he was done. You know there is something wrong when your kids refuses candy. Needless to say the majority of the bar is in my freezer for when I have a chocolate craving that has to be satisfied regardless of the taste of the chocolate in question. Lucky for me I had made brownies yesterday, so as soon as I got home I ate one. So much better than the chocolate bar. When I made the brownies yesterday I tried a new recipe for Cocoa Brownies from the Food Network.

This recipe has 8 ingredients. It takes 1 hour of total time, 15 minutes of which is active and makes 16 brownies. Due to a lack of eggs I made a number of major changes to the original recipe. First I only had 3 eggs, not 4 so I modified the recipe. Since I reduced the amount of eggs I also reduced the butter to 10 tablespoons. I am a big fan of dutch cocoa, the flavor is intense and delicious and it's what I used in this recipe. Finally, since I can't eat gluten I substituted brown rice flour for the all-purpose flour used in the original ingredient list. My baking time was exactly 45 minutes plus cooling. With gluten free baking you really do have to allow things to cool or they will fall apart.

These brownies turned out very rich and chocolatey. My boys and I were big fans of the intense flavor and they didn't even notice they were made with brown rice flour. The brownies turned out fudge like, which I like. I'm not as big of a fan of cake brownies, I would rather eat a great chocolate cake with frosting. Overall, a great new brownie recipe that I will definitely add to my recipe list.

For the recipe go to Cocoa Brownies.

June 20, 2013

Put Down the Take-Out Menu: Try Red Lentil Curry at Home

Click for Recipe for Red Lentil Curry
Red Lentil Curry


I made brownies for the first time in months tonight. My kids ate almost the entire batch in just a couple of hours. They were really good for gluten free brownies, probably the best I have made since I started baking gluten free. I normally would have allowed my kids to only eat one or two, but they have been very good this week. The weather has been hot and we have been spending a lot time in our front yard. Today I pulled out the super soakers for the first time this summer. They had so much fun running around playing in the water. It made me miss being young! Since it has been so hot I have been trying to keep my time in the kitchen to a minimum. The idea of spending hours with the oven on just isn't appealing when the weather is in the 90's with high humidity. This week I tried a new recipe for 40 Minute Red Lentil Curry from allrecipes.com.

This recipe has 13 ingredients. It takes 40 minutes of total time, 10 minutes of which is active and makes 8 servings. I did make a few changes to the original recipe. First I wasn't able to find curry paste, so I made my own. I thought that I had turmeric when I started this recipe, but it turned out that I didn't so I left it out. I allowed the lentils to cook for 25 minutes,  I like my red lentils to be pretty soft in curry. Finally, after all the ingredients were added I cooked the curry an additional 5 minutes.

The flavor on this curry is pretty mild. If your family likes the flavor of Indian food, but aren't fans of a lot of heat this recipe would be perfect. My husband and I added cayenne pepper to our servings to increase the heat. We both prefer our food to be a little spicier than the recipe as written. I served the curry over basmati rice and my kids really liked it. The recipe is a nice way to get kids to eat a larger variety of foods without having them turn up their noses.

For the recipe go to Red Lentil Curry.

June 19, 2013

Simple Comfort Food: Easy Baked Spaghetti

Click for Recipe for Baked Spaghetti
Baked Spaghetti


I had a case of blog burnout last week. Approximately twice a year I have to take a break from blogging. I love blogging for so many reasons, but I also have kids and a household to run and sometimes they don't blend well together. So a couple of times a year I have to take a step back. It didn't help that the herb garden that I had spent the last two months perfecting was stolen off my porch over the weekend. Sometimes I really do not understand people or what they are thinking. I was more than a little upset. Luckily the farmer's market had all their herb starters on clearance, so I started a new pot. It will take a while though before it resembles the one that was stolen. I am trying to keep my meals simple this week to keep my sanity. Tonight I tried a new recipe for Baked Spaghetti from Taste of Home.

This recipe has 10 ingredients. It takes 1 hour 25 minutes of total time, 25 minutes of which is active and makes 10 servings. I did make a few changes to the original recipe. First I used frozen spaghetti that I thawed. I seem to always have leftover pasta, so I freeze it for later use. For the seasoning salt I used Tony's for a bit of spice. Finally, my total cooking time was slightly longer than the original recipe. I allowed the spaghetti to bake for 35 minutes with the foil off in order that it fully browned.

Since I can't eat gluten the rest of my family sampled this dish. My kids were huge fans of this recipe. I liked that it was very easy to put together and made enough servings for multiple meals. Plus the servings are very big, so if you cut the pieces smaller you could make it stretch even further.

For the recipe go to Baked Spaghetti.

June 12, 2013

Olive Oil for Dessert? A Recipe for Olive Oil Cake with Cherry Topping

Click for Reciep for Olive Oil Cake with Cherry Topping
Gluten Free Olive Oil Cake with Cherry Topping


 Growing up my mother used a lot of olive oil. Pesto was one of her favorite dishes and I loved the smell and taste of the basil and olive oil together. She did use vegetable oil for some of her baking and recipes, but olive oil was always her favorite. As I got older I thought it was funny that suddenly olive oil became all the rage with foodies. I never realized that it wasn't popular since my mother loved shopping the Italian grocery stores back home and it was always a staple on our table. Now that I bake and cook for my family I have come to realize that not everyone buys the giant size of olive oil at the big box stores and uses it quicker than I am willing to admit. There are few things that compare to a simple dish with the right amount of extra virgin olive oil. Especially in the summer, it just seems natural. While many people know about cooking with olive oil, my mother introduced me to the idea of baking with it as well. It is a great substitute for butter or vegetable oil in many recipes and adds a nice buttery taste to cakes. Today I tried a new recipe for Olive Oil Cake from the July 2013 issue of Food and Wine magazine.

This recipe has 9 ingredients. It takes 50 minutes of total time, 20 minutes of which is active and makes 12 servings. I did make a number of significant changes to the original recipe. First since I eat gluten free I used a combination of almond meal (flour) and potato starch. I used 3/4 of a cup of potato starch and 1 cup of almond flour. I didn't have whole milk, so I substituted half and half. For the zest I used 1 lemon since I wasn't sure if my kids would be fans of a strong lemon flavor. Finally, I made a topping that the original recipe did not include. I have had frozen cherries in my freezer for a couple of months and I figured that they would be a great accompaniment to the cake. Instead of adding vanilla like the recipe I followed stated I substituted almond extract. There is something about cherries that screams almond extract to me.

Baking gluten free can oftentimes be very hit or miss, so I wasn't sure what to expect with this recipe. I was happy when it came out and it had actually risen like a regular wheat flour cake and the crust was nicely browned. My two boys really loved the cake and have already eaten half of it by the time I am writing this. This cake would be great either as written or gluten free and is a nice way to bake with olive oil.

For the recipes go to Olive Oil Cake and Cherry Topping.

June 11, 2013

Need A Use For Leftover Pasta? Try Baked Ziti


Click for Recipe for Baked Rigatoni
Baked Rigatoni

I think I might be becoming semi-obsessive with my tomato plants and their well being. This all started with my oldest insistent that we plant heirlooms this year. I agreed, it would be fun. Fun, hmmm. It has been fun, it also can drive a person crazy. See I tend to lean towards slightly overboard with most projects. I like things to be perfect and right. My son was at my in-laws for the last two weeks so I was excited that his tomatoes would be almost ripe by the time he got back. Then we had a nasty streak of hot and humid weather. I watered the tomatoes like I always do, but one of the plants just wasn't happy. After reading information online, a call to an extension agent and many conversations with friends that grow tomatoes I'm happy to say that his tomatoes are beautiful once again. As for me I think the tomatoes are becoming like another pet, a lot of work with an occasional reward. I hope it will be worth it the end, tomatoes and summer just seem to go hand in hand. This week to welcome my oldest back home I made comfort food. I tried a new recipe for Baked Ziti from the Food Network.

This recipe has 7 ingredients in the ziti and 9 ingredients in the sauce. It takes 50 minutes of total time, 20 minutes of which is active and makes 6 to 8 servings. I did make a few changes to the original recipe. First I used leftover frozen rigatoni pasta that I had made previously. I allowed it to defrost and then followed the rest of the recipe. Instead of Italian sausage I used ground roast chuck that I ground myself. I substituted the exact same amounts as in the original recipe. Since ground beef can be more watery than Italian sausage I allowed the sauce to cook down longer until it was nice and thick. After I put the baked ziti together in a casserole dish I allowed it to sit in the fridge for 4 hours to allow the flavors to soak into the pasta.

I served this recipe when my in-laws were over for dinner. Since I couldn't try the recipe myself I relied on everyone else to voice their opinions. My youngest son fell in love with this dish and told me it was his favorite pasta dish. The opinions expressed by my in-laws were similar. Overall, it was a nice way to use leftover pasta and a recipe I would make again. 

For the recipe go to Baked Ziti.

June 8, 2013

Absolutely Swimming in Homegrown Cherry Tomatoes? Try a Marinated Cherry Tomato Salad

Click for recipe for Marinated Cherry Tomato Salad
Marinated Cherry Tomato Salad


Ice cream, ice cream, ice cream. My two-year-old has been chanting this phrase most of the day. It's definitely ice cream season in my household. Every member of my household has their favorite flavors: my kids love anything with chocolate, I prefer frozen yogurt, and my husband always loves weird mix-ins like potato chips. We can all agree that no matter how it's made ice cream spells summer. During the colder months ice cream rarely makes an appearance in my house. It can get very cold here in the middle of winter and when I'm freezing the last thing that I want is something to make me even colder. In the summer it's a different story. I roast in the humidity and ice cream is a great way to cool off. Another of my favorite summer foods is tomatoes. This year I am growing my own, they are growing like crazy and by next week they should be ready to pick. In the meantime I have been relying on store bought tomatoes. Last week I tried a new recipe for Marinated Cherry Tomato Salad from allrecipes.com.

This recipe has 8 ingredients. It takes 2 hours 10 minutes, 10 minutes of which is active and makes 6 to 8 servings. I did make a few modifications. First I only had two cups of cherry tomatoes, so I cut the recipe in half. Second, I substituted olive oil for vegetable oil. I prefer cooking with olive oil when possible. Finally, I allowed the salad to sit 4 hours to ensure that the tomatoes fully absorbed the flavors.

My oldest son thought these tomatoes were spicy. The vinegar taste is definitely adult orientated. As an adult I really like the taste of the apple cider vinegar. It blended very nicely with the tomatoes and the recipe made a nice light side for the pasta dish that we ate it with. Overall, a great way to use summer tomatoes.

For the recipe go to Marinated Cherry Tomato Salad.

June 7, 2013

Overrippened Bananas Strike Again: Time for Banana Crumb Muffins

Click for Recipe for Gluten Free Banana Crumb Muffins
Gluten Free Banana Crumb Muffins


I have been shopping our pantry and freezer the last couple of weeks. Every 2 or 3 months I notice all the food bits that we have leftover such as half packages of pasta, condiments, half jars of olives etc. Then I make an effort to use as much as I can of everything before doing another large grocery trip. My pantry and freezer have had enough 'bits' of things to last me two weeks with another week or more of meals to go. We routinely eat leftovers, but the little portions of things I have to make an effort to go back and use every couple of months. So I have had a number of recipe experiments, most of which have gone well, a few not so much. Today my youngest son really wanted to eat the bananas he found at the store last weekend, but the heat had already gotten to them and they had turned brown. So it was muffin time again. Today I made a new recipe for Banana Crumb Muffins from Allrecipes.com.

This recipe has 12 ingredients. It takes 35 minutes of total time, 15 minutes of which is active and makes 10 muffins. I actually made two versions of this muffin, one gluten free and one as written. The major change that I made to the recipe was to puree my bananas in my blender before adding them to the wet ingredients. I'm not a fan of lumpy bananas, so this step eliminated that problem. For the topping I let the butter sit at room temperature and then rubbed the warm butter into the sugar mixture with my hands. This allowed for larger chunks of crumb on the muffins, which is what I prefer. My muffins took the entire 20 minutes of baking time to fully set.

The tops on these muffins are the best part. The muffins themselves are a little soft, I might suggest switching the butter to canola oil and adding a small amount of cinnamon or nutmeg to the batter. This would help with the flavor and texture of the finished muffins. My youngest son ate the tops off a number of the muffins, since that was his favorite part. The muffins are on the sweet side due to the topping, so if you are looking for a less sweet muffin you might want to leave off the topping.

For the recipe go to Banana Crumb Muffins.

June 6, 2013

Add Wholegrains to Your Breakfast Routine: Easy Overnight Oatmeal in the Slowcooker

Click for Recipe for Easy Overnight Crock-Pot Oatmeal
Easy Overnight Crock-Pot Oatmeal


My oldest caught his first fish this week. While for many kids this wouldn't be a big deal, for him it's huge. He has never been a child that has excelled at sports. Over the years he has tried t-ball, tennis and swimming. They all ended quickly when he realized that he was not going to be a sports star. I was so ecstatic when my mother-in-law called and informed me that he had caught a ten inch bass, by himself. Of course now he has made my in-laws buy him a new fishing pole and buy fishing licenses. I'm just happy that he has actually found something that he enjoys and is good at. Since my oldest is at my in-laws fishing up a storm, my youngest and I have been left to ourselves for meals. During the week I am a big fan of healthy breakfasts that I can get on the table quickly. This week I tried a new recipe for Overnight Oatmeal from the Food Network.

This recipe has 5 ingredients. It takes a total time of 9 hours 10 minutes, 10 minutes of which is active and makes 4 servings. I did make significant changes to the original recipe. I ended up making the recipe twice, once as written and once with large changes. The first batch of oatmeal was too strong on the fruit, it almost tasted like a warmed fruit dish instead of steel cut oats. For the second batch I left out the dried food completely. Instead, I used 1/4 cup of pure maple syrup and 2 teaspoons pure vanilla extract. I followed the same amounts of half-and-half, water and steel cut oats as the original recipe. After I portioned the servings into bowls I added additional non-fat half-and-half. My oldest and I are fans of thinner oatmeal so this step allowed for the desired texture.

Putting the ingredients in the crock-pot the night before made for a very easy breakfast. The original recipe was too heavy on the fruit, but with my changes the oatmeal was perfect. If you aren't a fan of sweet oatmeal, you could try almonds, pecans or walnuts. Cinnamon or nutmeg would also work for flavor.

For the recipe go Overnight Oatmeal.

June 4, 2013

Tired of Boring Pork Dishes? Try Ginger Orange Pork Tenderloin with Ramps

Click for Recipe for Ginger Orange Pork Tenderloin with Ramps
Ginger Orange Pork Tenderloin with Ramps


Today was free museum Tuesday at the Huntington Museum of Art. Since my husband and I are trying to expose my youngest son to a wide variety of cultural experiences we thought this would be a great day to take him. Plus it was free which is always a bonus since I am basically pretty cheap. Given the fact that he is 4 he did very well. Most of the paintings and sculptures lost his interest quickly, but he did enjoy the Eastern weapon room and the antique firearms. The piece of art that grabbed his attention the most was outside. It had metallic arms that moved around, basically a modern art version of a whirligig. He was fascinated. There was also a lizard running around the outside walls of the museum that he was determined he should take home (don't worry that was a no go). One of my favorite parts about the museum is that they have a large section of land with nature walks. Since I have a lively 4-year-old it was a great way to wind him down. Given that today was a busy day, I utilized leftovers from a meal I made earlier in the week. It is hard to have fresh meals every night, so I make a point of eating leftovers at least once a week. This way no food is wasted and I save money from my food budget. Tonight my family enjoyed leftovers of the Ginger Orange Pork Tenderloin recipe from the April 2013 issue of All You magazine.

This recipe has 8 ingredients. It takes 45 minutes of total time, 15 minutes of which is active and makes 4 servings. I did make a few changes to the original recipe. First, I found clearance blood orange juice, so I utilized it for the recipe. Second, my shallots had gone bad, so I used the ramps that I had in the freezer. I used one whole ramp (leaves and stem), minced. Instead of vegetable oil I used canola oil, I prefer olive oil and canola in my baked goods and recipes. I am happy to say that my herb garden is doing great, so I was able to use fresh thyme.

The ramps added a nice flavor to the sauce in this dish. The pork was pretty plain, so I would suggest a few changes. I would either rub the pork with a spice rub (cayenne would work well if you like a bit of a kick, or a combination of cumin, coriander or cinnamon). Another option would be to marinade the pork in a citrus marinade. Not only would this make the taste delicious it would help to keep the pork moist while cooking. Most importantly I would double the sauce amount since it was the best part of the recipe,  you will want plenty of it to enjoy!

For the recipe go to Ginger Orange Pork Tenderloin.

June 3, 2013

Looking For a Recipe For Your Overripe Bananas? Try Banana Chocolate Chip Muffins


Click for recipe for Gluten Free Banana Chocolate Chip Muffins
Gluten Free Banana Chocolate Chip Muffins


My youngest has fallen in love with the library. He has always been a very active child so my husband and I waited until this last weekend to introduce him to our public library. While he has been 4 since December it is only in the last couple of months that he has been able to understand not to break, rip or destroy other people's property. I was a little worried how he would react to the library since he has shown little interest in books despite my best efforts. Apparently the library was the perfect answer. He has asked to go back to the library the last three days. Best of all this afternoon he asked me to read three library books and he is recognizing his alphabet letters with very little help. I love libraries! I try to bake special treats when my children hit milestones or accomplish something new. In light of my son's new love of reading I made a batch of Favorite Banana Chip Muffins from the June/July issue of Taste of Home magazine.

This recipe has 10 ingredients. It takes 40 minutes of total time, 20 minutes of which is active and makes 12 muffins. I made a number of changes to the original recipes. Since I eat gluten free I used gluten free all-purpose baking mix. The baking mix I use already has salt so I omitted the salt from the recipe. I am not a fan of lumps of banana in my muffins, so instead of mashing the bananas I pureed them in a blender. This allowed for a great banana flavor throughout the muffin and no lumps. My muffins took an additional 5 minutes of baking time, for a total of 25 minutes. Gluten free muffins tend to take a little longer to bake.

My husband isn't a fan of gluten free baking, but he loved these muffins. Pureeing the bananas allowed for a great flavor and texture. My youngest son was a fan of the chocolate chips and ate 3 muffins in just a couple of hours. This recipe is definitely kid and adult friendly.

For the recipe go to Favorite Banana Chip Muffins.

June 1, 2013

Need a Change to Your Breakfast Routine? Try a Recipe For Toasted Muesli

Recipe for Toasted Muesli Over Greek Yogurt and  Fresh Berries
Toasted Muesli Over Greek Yogurt and  Fresh Berries


This has been a day of free in my household. I am cheap. Not in the bad I don't spend any money on things that are important, but in the if I can find free entertainment I jump at it way. My oldest is at my in-laws house for the week so my youngest is by himself and needing entertainment. I am a firm believer in taking full advantage of local events so our day was filled with free or budget friendly activities. We spent time at the play center at the mall (love that place), went shopping for cheap locally produced strawberries, played on a retired train and spent time at the library. Everything except the strawberries was free and my youngest loved it. We also took a nice leisurely drive and talked about the various landmarks in our area. Best of all I discovered that the movie theater is having free movie Tuesdays again this summer, making one more cheap kid activity. My cheapness also extends to food. I love finding recipes that can be stretched to last throughout the week. Last week I tried a new recipe for Toasted Muesli from Martha Stewart Living magazine.

This recipe has 7 ingredients. It takes a total of 45 minutes, 5 minutes of which is active and makes 8 servings. I only made a few changes to the original recipe. My husband ate all of the pumpkin seeds before I was able to make the recipe, so I substituted unsalted sunflower seeds. I have never been able to find large coconut flakes, so I used the shredded unsweetened coconut I already had in my pantry. My youngest and I enjoyed the muesli over Greek yogurt and fresh blueberries.

If you liked your muesli sweet you will need to increase the maple syrup. I like to be able to add a small amount of sweetener to my yogurt, so this muesli was plenty sweet when added to my yogurt along with sweetener and fresh berries. It also made a nice snack right out of the bag without being used as a topping or stir-in.

For the recipe go to Toasted Muesli.
Related Posts Plugin for WordPress, Blogger...